
This post is also available in:
![]() Deutsch
Deutsch
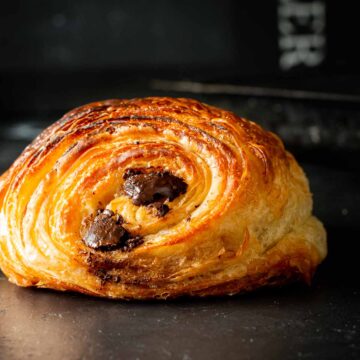
These vegan chocolate croissants are a delight for the senses! Crispy, buttery, and generously filled with delicious dark chocolate, this recipe yields 8 decadent treats. This recipe is spread across 2 days, but worry not! You'll only need to actively work for 1 hour throughout the entire process. With only 7 easy-to-find ingredients, these croissants are a breeze to make

If you're smitten with these delectable vegan chocolate croissants, you're in for a treat with our plain vegan croissants recipe! And if you're craving more vegan breakfast ideas, why not give our vegan dandelion honey or vegan chocolate spread a try? Each of these recipes promises to deliver delightful flavors and wholesome ingredients that will elevate your breakfast game to new heights.
Jump to:

⭐ Why I love this recipe
I love this vegan chocolate croissants recipe because it's super tasty! The croissants are crispy, buttery, and packed with delicious chocolate. Plus, the recipe makes 8 servings that I can easily freeze for another day. When I'm ready to serve them, I just let them thaw in the fridge overnight and pop them in the oven for a quick reheat. They taste just like it's freshly baked!
These chocolate croissants are my go-to treat when I want something yummy. They're easy to make and perfect for satisfying my sweet tooth. With just a little prep, I can have a delicious breakfast ready whenever I need it.

🧾 Ingredients
To whip up these delicious vegan chocolate croissants, you only need 7 simple ingredients. However, because the ingredient list is short, each component plays a crucial role in the final flavor and texture of the croissants. That's why it's essential to opt for high-quality ingredients. These are the key ingredients to make them:
- vegan butter: Choosing the right vegan butter is key. I opt for a type that hardens well in the fridge, avoiding spreadable options that might melt during the lamination of the dough. Cultured vegan butter is ideal, adding a hint of tanginess that enhances the croissants' flavor.
- vegan dark chocolate: I opt for vegan dark chocolate with around 80% cocoa content. Its intense chocolaty flavor and slight bitterness complement the sweetness of the croissants perfectly, resulting in a rich and balanced taste experience.
- all-purpose flour: I use all-purpose flour with approximately 12% protein content for this recipe. The protein ensures that the dough maintains its structure despite the high fat content, resulting in perfectly formed croissants with a delightful texture.
- vegan cream: I use vegan cream to brush the croissants before baking, which helps achieve a beautiful golden crust.

Substitutes
Since we use so few ingredients, these are the only ones that can be substituted:
- oat milk: use the same amount of soy or almond milk.
- vegan cream: can be replaced with a mixture of 4 tablespoons of oat milk and 1 teaspoon of maple sirup.
🥄 Equipment
The essential equipment I use for making these croissants includes a rolling pin, a ruler, a pastry brush, baking paper, and plastic wrap.
While optional, I find that using my KitchenAid mixer with the dough hook attachment makes kneading easier.
🥣 How to make
In this section, you'll find a detailed recipe with step-by-step guidance, accompanied by useful images for each step. Simply follow along, allowing the visuals to assist you in crafting these delightful vegan pastries. The method employed in this recipe draws inspiration from Chef Claire Saffitz's approach, which I find to be straightforward and yields exceptional results. Enjoy your baking adventure!
Timing
Prior to delving into the step-by-step guide, it's crucial to grasp the timeline involved. Crafting these chocolate croissants spans across 2 days. The initial day is dedicated to preparing the dough and laminations, while the subsequent day involves shaping the croissants, allowing them to rise, and baking them.
On the first day, I suggest allocating around 8 hours. During this time, we'll be working for approximately 45 minutes. For the second day, I suggest to set aside 4-6 hours, of which we'll be working actively for about 20-30 minutes.
Détrempe (day 1)

Step 1: Begin by preparing the dough. Combine flour, salt, sugar, yeast, oat milk, and water in a sizable bowl. Stir until the ingredients form a dough. If available, utilize a stand mixer with the dough hook attachment on low speed.
Cover the bowl with a kitchen towel and allow the mixture to rest for 20 minutes. Subsequently, knead the dough until it becomes smooth and elastic. Add the vegan butter into the dough and continue kneading until fully incorporated. The dough should exhibit a smooth and glossy texture.

Step 2: Shape the dough into a ball and make a cross-shaped incision on its surface using a sharp knife. Cover the dough with plastic wrap and allow it to rise until doubled in size. Then, transfer it to the refrigerator and let it chill for a minimum of 4 hours or overnight.
Beurrage

Step 3: In a spacious bowl, combine vegan butter and flour, and mix thoroughly using a fork. This ensures that the butter remains intact within the chocolate croissants during baking. Refrigerate the butter mixture for a brief period to allow it to slightly solidify.

Step 4: Following that, use a spoon to dollop the butter onto a 20x20 centimeters (8x8 inches) piece of baking paper.

Step 5: Transfer the butter onto a larger parchment paper sheet by flipping it over.

Step 6: Press the butter tightly, then flip and roll it to ensure even distribution into the corners of the square. Place it in the refrigerator to allow it to rest.
First Lamination

Step 7: Remove the dough from the refrigerator and shape it into a square measuring 20x20 centimeters (8x8 inches). Arrange two sheets of plastic wrap in a cross formation on the work surface, then place the dough at the center where they intersect.

Step 8: Wrap the dough, ensuring its edges remain squared. Roll a rolling pin over it to ensure the dough fills the plastic wrap, forming an 8-inch square with straight sides and right angles. Place it in the freezer for 20 minutes.
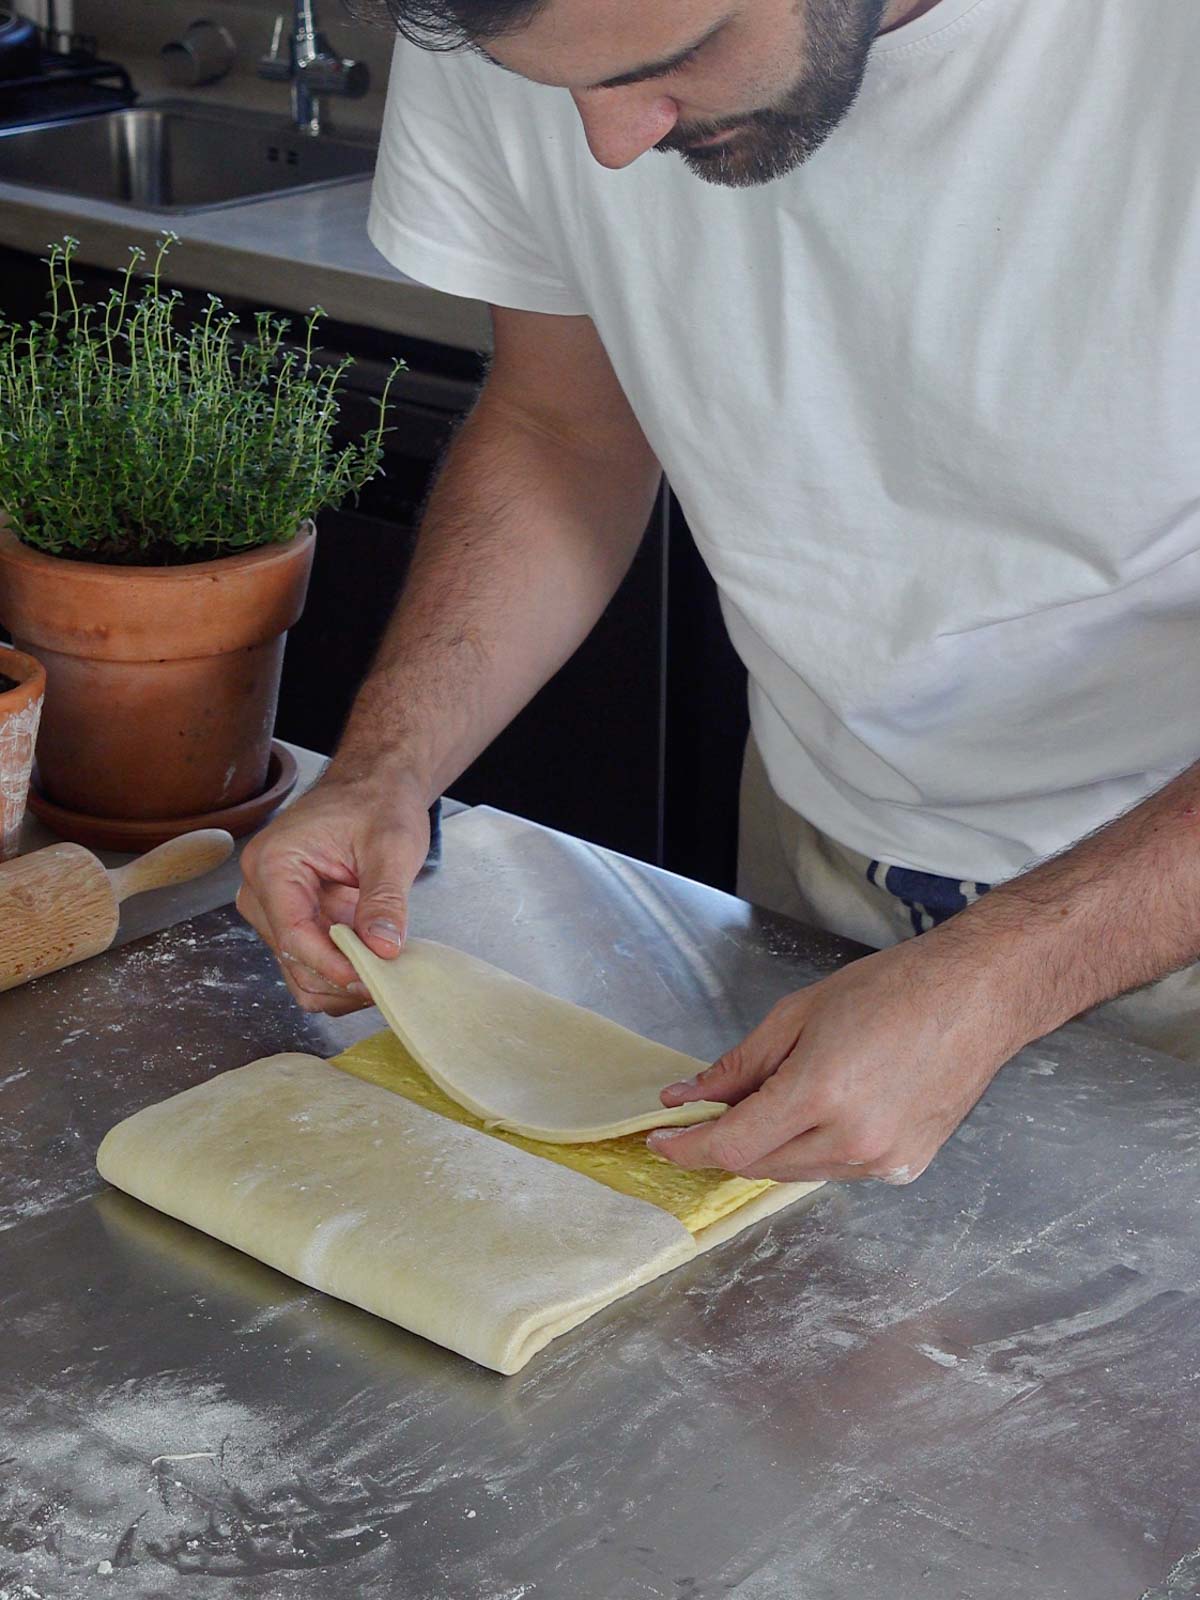
Step 9: Take the dough out of the freezer and remove the butter from the fridge. Roll out the dough into a 40 x 20 cm (16 x 8 inches) rectangle. Position the vegan butter block in the center of the rectangle. Fold both sides of the dough over the butter towards the center, pressing firmly along all seams to ensure the butter is completely enclosed.
Step 10: Rotate the dough 90 degrees to orient the center seam vertically. Roll out the dough lengthwise along the seam until it extends to a length of 60 centimeters (24 inches), ensuring the width remains consistent at 20 centimeters (8 inches) throughout. Trim off any surplus dough at the shorter ends with a sharp knife, and square the corners to achieve a uniformly shaped rectangle with straight edges.

Step 11: Fold the shorter edges of the rectangle towards the center of the dough slab, ensuring they meet seamlessly with a slight gap at the center.

Step 12: Fold the entire dough slab in half widthwise, resulting in a rectangular packet. Wrap it in plastic wrap, ensuring it is tightly sealed, and then transfer it to the freezer for a 20-minute chill followed by 1 hour in the refrigerator.
Second Lamination

Step 13: After allowing the dough to rest at room temperature for 5 minutes, roll it out into a new slab measuring 60x20 centimeters (32x8 inches). Implement a tri-fold technique akin to folding a letter: lower the top third of the slab over the center third, then raise the bottom third up and over.
Subsequently, tightly wrap the square in plastic wrap, placing it in the freezer for 15 minutes before refrigerating for 1 hour.

Step 14: After letting the dough sit at room temperature for 5 minutes, roll it out into a slab measuring 30x35 centimeters (12x14 inches). Securely wrap the slab in plastic wrap, then place it in the freezer for 20 minutes followed by an overnight chill in the refrigerator (8 to 12 hours).
Shaping

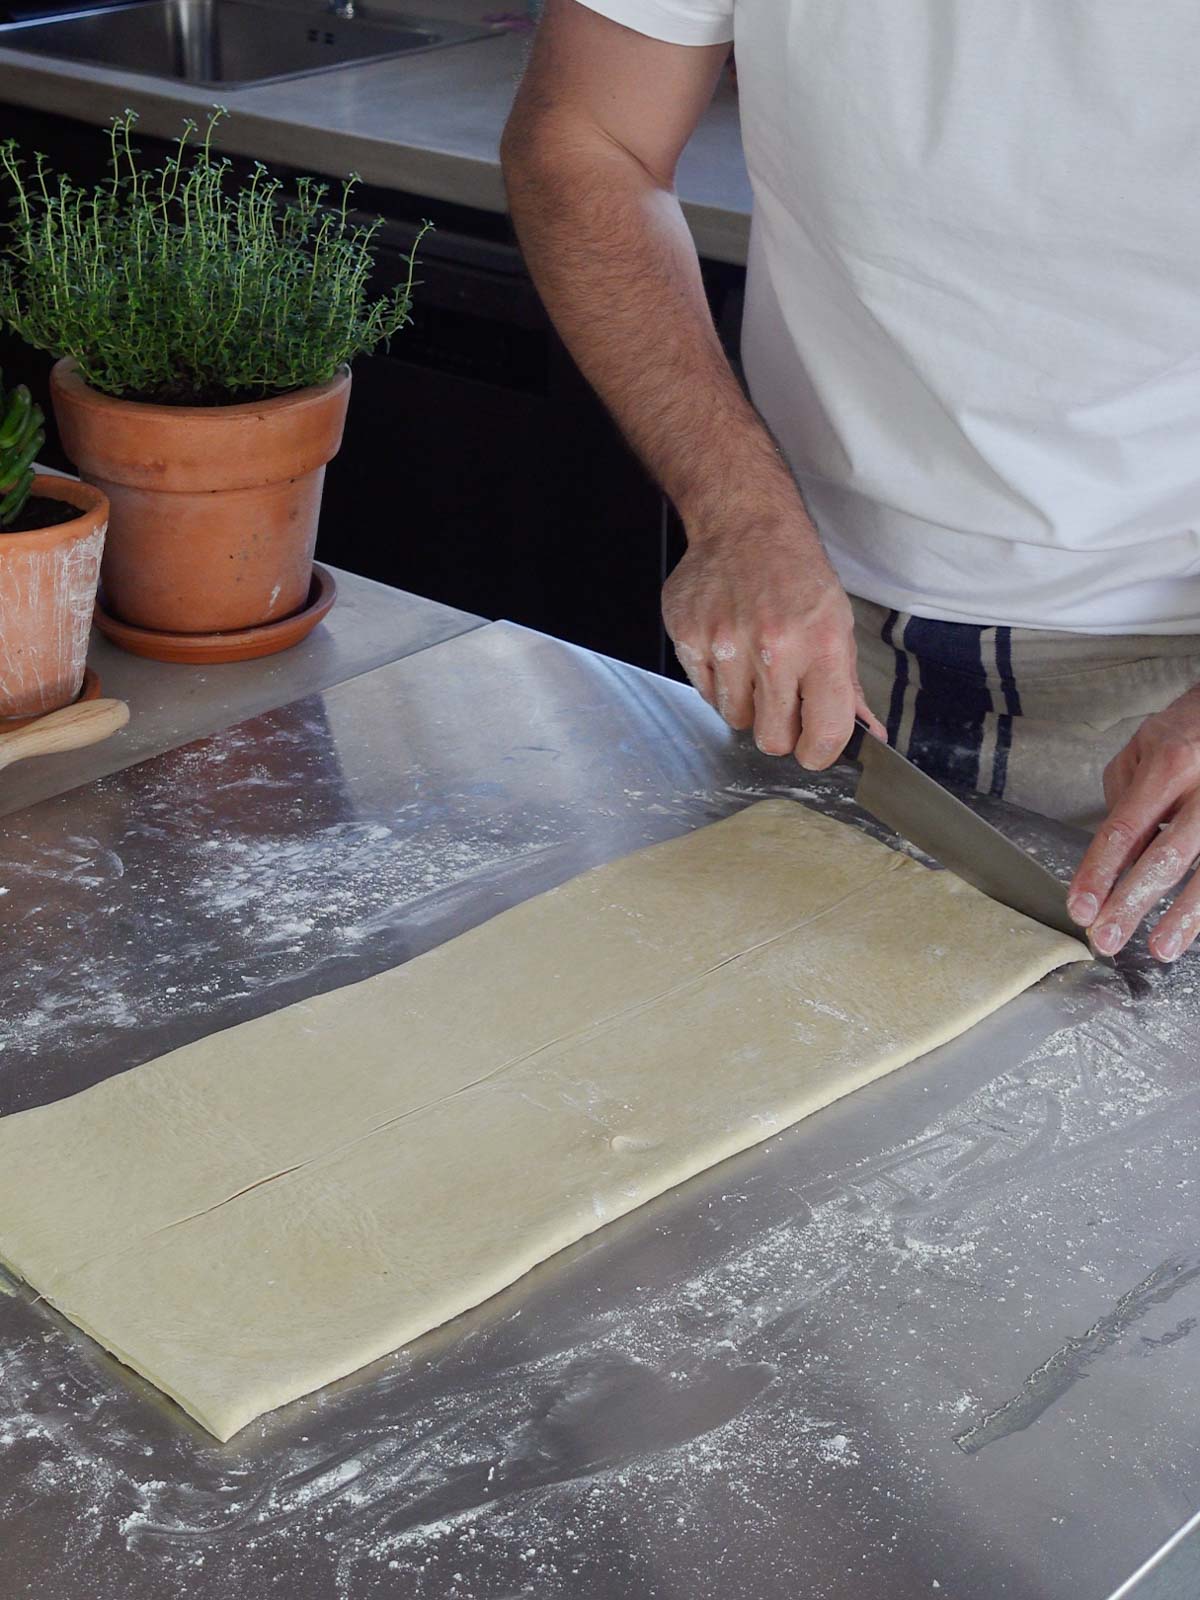
Step 15: Allow the dough to rest at room temperature for 5 minutes, then roll it out to a size of 45x35 centimeters (17x14 inches).
Using a sharp knife, trim the shorter sides to create a rectangle measuring 40x35 centimeters (16x14 inches).

Step 16: Then, proceed to cut the rectangle into four smaller rectangles, each measuring 10x35 centimeters (4x14 inches). Ensure the rectangles are separated so they do not touch.
Now, you have the choice to make either 4 large croissants or 8 normal-sized ones. If opting for the large ones, leave the rectangles as they are. However, for the normal-sized croissants, cut each rectangle width-wise in half, resulting in 8 (10x17.5 centimeters / 4x7 inches) smaller rectangles.

Step 17: Place a stick of chocolate on the edge of a rectangle and roll tightly enclosing it in the dough.

Step 18: Then place a second chocolate stick on the dough and roll tightly. Place the croissants on a baking sheet, seam side down, leaving some space between them.

Step 19: Brush the vegan chocolate croissants with water and cover loosely with plastic wrap. Allow them to rise until doubled in size. This will take around 3 hours at 25 degrees Celsius (77 Fahrenheit).

Step 20: Preheat the oven to 190 degrees Celsius (375 degrees Fahrenheit), brush the croissants with vegan cream and bake them in the middle of the oven for approximately 25-30 minutes until they turn golden and crispy.
👨🏻🍳 Expert tip
Achieving perfect vegan chocolate croissants hinges on maintaining optimal dough temperature throughout the process. Keeping the dough cold ensures that the vegan butter layers remain intact, resulting in a delectable combination of soft interior and crispy exterior. Never rush the dough's resting time in the freezer or refrigerator; this step is crucial for success.
If the dough begins to warm up and butter seeps out, act swiftly by returning it to the freezer for 20 minutes. Then, allow it to rest for 1 hour in the refrigerator before continuing with lamination.
When flattening the dough, use a gentle touch and apply light pressure to ensure even butter layers. If the dough resists while rolling, allow it to rest briefly at room temperature; this will facilitate easier rolling.
Lastly, always dust your work surface with flour to prevent sticking. This practice is essential for preserving the integrity of the pastry layers.
💭 Baking tips
Once the croissants are shaped, you have several baking avenues to explore. Option one involves immediate baking following the steps outlined in the recipe.
Alternatively, for a prolonged proofing process, allow the croissants to rise at room temperature for an hour under loosely draped plastic wrap. Then, refrigerate the tray for 12 hours until the croissants double in size. Once doubled in size you can bake them.
For those planning ahead, freeze the formed croissants on parchment-lined trays. Once they are frozen, place them in an airtight container. This way, the pains au chocolat will keep for 2-3 weeks. The night before serving, transfer the frozen croissants to a parchment-covered baking sheet, allowing them to thaw and rise overnight at room temperature. In the morning, preheat the oven and bake as instructed.
⌛ Quicker version
This new recipe is a better, more delicious version of the original one that I shared on this blog. The old recipe was quicker and you could make the croissants all in one day.
To make the croissants within one day using this recipe, once the détrempe-dough is smooth, don't wait for it to rise and rest in the fridge. Instead, get straight to the first lamination. Do both rounds of lamination, and the shaping all on the same day. But take breaks in between to chill the dough in the freezer for 20 minutes and in the fridge for 1 hour (as described in the recipe card below). When your croissants have risen nicely, bake them according to the instructions below.
❄️ Storage
For optimum storage of these vegan chocolate croissants, freezing is your best bet. Once baked and cooled, securely seal them in an airtight container before popping them into the freezer. When you're ready to indulge, thaw them overnight in the refrigerator. Prior to serving, reheat them in a preheated oven at 180 degrees Celsius (360 degrees Fahrenheit) for about 5 minutes.
Alternatively, store the croissants in an airtight container in the refrigerator for up to 3 days. Before reheating, lightly moisten them with water and then bake in a preheated oven at 180 degrees Celsius (360 degrees Fahrenheit) for 7-8 minutes.
👪 Serving size
This recipe yields 8 servings. If doubling the batch, I suggest making two blocks of croissant-dough to maintain consistency without alterations of the recipe.
However, if 8 servings seem excessive, keep in mind that you can store the croissants in the freezer for 2-3 months, ensuring you have breakfasts prepared for an extended period! Yay!
📔 FAQ
The colder the room temperature, the more time the croissants will need to rise. Let them proof longer and eventually they'll rise.
If the croissants leak butter it means that they needed to be proofed longer. Be aware that a little leak is totally normal.
You can use vegan white chocolate or any other type of vegan chocolate you like
🎥 Video
📖 Recipe
Vegan Chocolate Croissants
Equipment
- 1 Rolling Pin
- 1 ruler
- 1 pastry brush
- baking sheet
- plastic wrap
Ingredients
Dough
- 600 grams all-purpose flour 12% protein plus more for dusting
- 70 grams sugar
- 12 grams salt
- 7 grams active dry yeast
- 220 grams water at room temperature
- 100 grams oat, soy or almond milk unsweetened, at room temperature
- 60 grams stable vegan butter** chilled
Beurrage
- 340 grams stable vegan butter** chilled
- 34 grams all-purpose flour
Filling:
- 160 g vegan dark chocolate cut into 10 cm long bars
Brushing
- 3 tablespoons vegan cream
Instructions
Détrempe (day 1)
- Begin by preparing the dough. Combine flour, salt, sugar, yeast, oat milk, and water in a sizable bowl. Stir until the ingredients form a dough. If available, utilize a stand mixer with the dough hook attachment on low speed.
- Cover the bowl with a kitchen towel and allow the mixture to rest for 20 minutes. Subsequently, knead the dough until it becomes smooth and elastic. Add the vegan butter into the dough and continue kneading until fully incorporated. The dough should exhibit a smooth and glossy texture.
- Shape the dough into a ball and make a cross-shaped incision on its surface using a sharp knife. Cover the dough with plastic wrap and allow it to rise until doubled in size. Then, transfer it to the refrigerator and let it chill for a minimum of 4 hours or overnight.
Beurrage
- In a spacious bowl, combine vegan butter and flour, and mix thoroughly using a fork. This ensures that the butter remains intact within the chocolate croissants during baking. Refrigerate the butter mixture for a brief period to allow it to slightly solidify.
- Following that, use a spoon to dollop the butter onto a 20x20 centimeters (8x8 inches) piece of baking paper. Transfer the butter onto a larger parchment paper sheet by flipping it over.
- Press the butter tightly, then flip and roll it to ensure even distribution into the corners of the square. Place it in the refrigerator to allow it to rest.
First lamination
- Remove the dough from the refrigerator and shape it into a square measuring 20x20 centimeters (8x8 inches). Arrange two sheets of plastic wrap in a cross formation on the work surface, then place the dough at the center where they intersect. Wrap the dough, ensuring its edges remain squared. Roll a rolling pin over it to ensure the dough fills the plastic wrap, forming an 8-inch square with straight sides and right angles. Place it in the freezer for 20 minutes.
- Take the dough out of the freezer and remove the butter from the fridge. Roll out the dough into a 40 x 20 cm (16 x 8 inches) rectangle. Position the vegan butter block in the center of the rectangle. Fold both sides of the dough over the butter towards the center, pressing firmly along all seams to ensure the butter is completely enclosed.
- Rotate the dough 90 degrees to orient the center seam vertically. Roll out the dough lengthwise along the seam until it extends to a length of 60 centimeters (24 inches), ensuring the width remains consistent at 20 centimeters (8 inches) throughout. Trim off any surplus dough at the shorter ends with a sharp knife, and square the corners to achieve a uniformly shaped rectangle with straight edges.
- Fold the shorter edges of the rectangle towards the center of the dough slab, ensuring they meet seamlessly with a slight gap at the center.
- Fold the entire dough slab in half widthwise, resulting in a rectangular packet. Wrap it in plastic wrap, ensuring it is tightly sealed, and then transfer it to the freezer for a 20-minute chill followed by 1 hour in the refrigerator.
Second lamination
- After allowing the dough to rest at room temperature for 5 minutes, roll it out into a new slab measuring 60x20 centimeters (32x8 inches). Implement a tri-fold technique akin to folding a letter: lower the top third of the slab over the center third, then raise the bottom third up and over. Subsequently, tightly wrap the square in plastic wrap, placing it in the freezer for 15 minutes before refrigerating for 1 hour.
- After letting the dough sit at room temperature for 5 minutes, roll it out into a slab measuring 30x35 centimeters (12x14 inches). Securely wrap the slab in plastic wrap, then place it in the freezer for 20 minutes followed by an overnight chill in the refrigerator (8 to 12 hours).
Shaping (day 2)
- Allow the dough to rest at room temperature for 5 minutes, then roll it out to a size of 45x35 centimeters (17x14 inches). Using a sharp knife, trim the shorter sides to create a rectangle measuring 40x35 centimeters (16x14 inches).
- Then, proceed to cut the rectangle into four smaller rectangles, each measuring 10x35 centimeters (4x14 inches). Ensure the rectangles are separated so they do not touch.
- Cut each rectangle width-wise in half, resulting in 8 (10x17.5 centimeters / 4x7 inches) smaller rectangles. Place a stick of chocolate on the edge of a rectangle and roll tightly enclosing it in the dough.
- Then place a second chocolate stick on the dough and roll tightly. Place the croissants on a baking sheet, seam side down, leaving some space between them.
Baking
- Brush the vegan chocolate croissants with water and cover loosely with plastic wrap. Allow them to rise until doubled in size. This will take around 3 hours at 25 degrees Celsius (77 Fahrenheit). Then gently brush them with vegan cream.
- Preheat the oven to 190 degrees Celsius (375 degrees Fahrenheit), and bake the croissants in the middle of the oven for approximately 25-30 minutes until they turn golden and crispy.
Alicia says
Thank you for a great recipe, although I am looking for the original one as I had great success with it and the period was over 1 day. Thank you
Carlo says
Hi Alicia, I added a chapter "quicker version" explaining how to make this recipe within 1 day (as the old recipe did). The only things I changed in this new (better) recipe is giving the dough more time to rest, adding butter to the dough (makes the dough richer and more flavorful) and adding 10% of flour to the block of butter (so that the croissants do not leak butter while baking). I hope this helps, and I hope you love this recipe more than the old one. Trust me when I tell you that it is way better and so delicious. X Carlo
Angela Rossi says
Did this recipe change? I made these last week and wanted to try again with a different butter, but the recipe seems completely different. The previous recipe was over 1 day not 2. Is there anyway to access the old recipe? Thank you!
Ange says
Nevermind. I found it on the way back machine. Thanks for the awesome recipes. I will try the new recipe and see how it compares.
Alicia says
I looking for the original one too! I’m going to try make it from memory as they were really great!
Carlo says
Hi Angela, I added a chapter called "quicker version" explaining how to make this recipe within 1 day (as the old recipe did). The only things I changed in this new (better) recipe is giving the dough more time to rest, adding butter to the dough (makes the dough richer and more flavorful) and adding 10% of flour to the block of butter (so that the croissants do not leak butter while baking). I hope this helps, and I hope you love this recipe more than the old one. Trust me when I tell you that it is way better and so delicious. X Carlo
Martin says
For step 24 you say to “put them in the oven and close it. Allow to rise for 2 hours or until they've doubled in size.”
Should the oven be on or off during this time?
carlocao says
Hi Martin, the oven has to be off. X Carlo
graliontorile says
I just couldn't depart your site before suggesting that I extremely loved the usual info an individual supply for your guests? Is gonna be back incessantly in order to check up on new posts.
Essie says
When initially making the dough how long do you knead it? What texture should it be? Is it at all dry or flakey? Thank you! Such a yummy recipe!
carlocao says
Hi dear, I cannot tell you how long you have to knead it for because it really depends on your technique, just knead it until it's smooth and elastic 🙂 it should not be dry, but not too sticky either. I hope this helps. Best, Carlo
Aaron says
If you want to prepare them the day before so that you can bake them the next morning, at which step would you put them in the fridge overnight?
Carlo says
Hi Aaron, Shape them and place them on a tray covered with baking paper. Set them in the fridge to rise overnight and bake them the next morning. If they‘re not doubled in size yet just let them sit at room temperature until doubled. Let me know how they turn out. Best, Carlo
Tonya says
These look delicious! My husband is a big pain au chocolate fan, so I can’t wait to try these.
Can the dough be frozen before assembling and baking? I’m hoping to make a double recipe, use half for pain as chocolate and half for my Christmas Wellington.
carlocao says
Dear Tonya, yes you can do it. You just have to shape them first, than freeze them on trays and then bag them. To bake them: If the kitchen is not too warm, take them out of the freezer and place them on a baking tray lined with baking paper before bed. So they'll thaw and proof overnight. They'll be ready for the oven in the morning. Best, Carlo
Sarah says
Do I need to let yeast activate in warmed water first? Or just throw it in dry with the rest of the the ingredients?
carlocao says
Hi Sarah, I normally never activate dry yeast. Best, Carlo
Robin says
Would this work with any type of gluten free flour?
carlocao says
Hi Robin, I never tried with gluten free flour so I cannot answer your question. If you try, please let me know how they turn out 🙂
Em says
Robin, I tried this recipe with a gluten free flour, and it didn’t work: the dough lacked elasticity, fell apart, and didn’t rise. I may try again adding xanthum gum.
I also tried spelt flour and it worked great! Spelt flour is not gluten free but the kind of gluten it has is less and different from that of wheat, if that helps.
Kamini says
In your second lamination you said the dough should be rolled into a 60cm x 25cm rectangle, which is actually 24” x 10” and NOT 24 x 18 like you mention.
Cant wait to try this. Thanks
Whitney says
I tried this and the chocolate I used and the chocolate I used oozed out a ton while baking, ended up on the bottom of the oven causing a ton of smoke. (I used an cookie sheet with no rim… probably should have thought about that beforehand, so my bad!)
The vegan butter (miyoko's) also seemed to leak out while cooking.
It also took much longer to bake. About 35 min. That's probably because they were under-proofed & still a bit cold when going in the oven.
Once the smoke cleared, they turned out tasty, though. I'll probably give it another go sometime.
carlocao says
Hi dear, it's normal for a little butter to leak, don't worry. 35 minutes sound like way too much time to bake croissants, are you sure your oven was preheated? Also if the chocolate oozed out it's because you put too much chocolate in your croissants, look at my pictures, you only need a small amount 🙂 let me know if you try them another time 🙂
Lettuce_Eat_Better says
Loved making these! Definitely helps to make sure the margarine is super cold. I cannot believe how flaky they turned out!
carlocao says
Thank you so much for your feedback! I'm so glad you loved them! Hugs, Carlo
Nayla says
It would help if you provide an example of a good vegan margarine brand to use. Tried to make it with the only vegan certified margarine I found at the supermarket (which did not call it a "spread") and it was a total disaster 🙁
carlocao says
Can you tell me exactly what went wrong, only so I can try to help you out. I use the alnatura margarine block (the one that comes in a orange package). Any margarine that gets rock hard when cold will do the job.
Nayla says
After I folded the dough over the margarine square and started rolling gently, the margarine got squeezed out and was all over the place. It was too soft, and all the other solid margarine blocks I found in the supermarket were not vegan. Would vegan butter work instead? I have solid blocks of those.
carlocao says
From what you're telling m your margarine block was definitely not cold enough. The block has to be hard. You can definitely use vegan butter. It simply has to get hard as a rock once cold. If it gets hard than you can perfectly use it for the croissants. I hope this helps 🙂